|
Serial Thin Sectioning - The Hartwieg Method
by Hall, Hartwieg and Nguyen
doi:10.3908/wormatlas.9.9
Overview
There are five prerequisites to obtaining reliable serial sections:
- the tissue must be well fixed
- the tissue must be well infiltrated
- the tissue must not be too large
- the microtome must be in good condition, so the advance mechanism can deliver sections of a consistent thickness
- a high quality diamond knife must be used
Recommended equipment
There are currently two vendors who sell excellent ultramicrotomes for cutting thin sections for TEM. Leica offers the EM Ultracut 7 (UC7), which is the premiere machine on the market. Earlier Leica models may still be available as used machines and these can be very good as well. RMC (Tucson, AZ) currently offers the PowerTome XL; older RMC models may also be available, but the PowerTome XL is recommended. Our previous favorite machine, the Sorvall MT2B, has long since been discontinued from production, and even if one can find a used Sorvall machine, it is now difficult to find adequate parts or service.
Diamond knives are essential for cutting satisfactory thin sections. The elite vendor is Diatome, who produces superior knives that can be resharpened up to five times if they become scratched or dull. Alternate sources for good diamond knives include DDK, Microstar, and SPI. Specialized versions of the diamond knife are available from Diatome for collecting cryo-thin sections, for trimming tools, and for other specialized procedures.
There are two good choices for a glue to promote serial sections to stick together.
- “Charette wax” is designed for use as a clean, tacky substance for mounting art prints and can be found in an artist supply store. Use a toothpick to add a very thin amount of wax to the top of the block.
- Glue from the back of 3M Scotch Tape can be dissolved in a tiny amount of acetone on the tape; then use a toothpick to paint this glue onto the top of the block.
We recommend using either Pioloform-coated grids or Formvar-coated grids (See Grid making). A better grid coating can be produced within the lab than is generally available from any vendor. Experience has taught us that Pioloform is more reliable than Formvar by providing better strength and stability.
Trimming
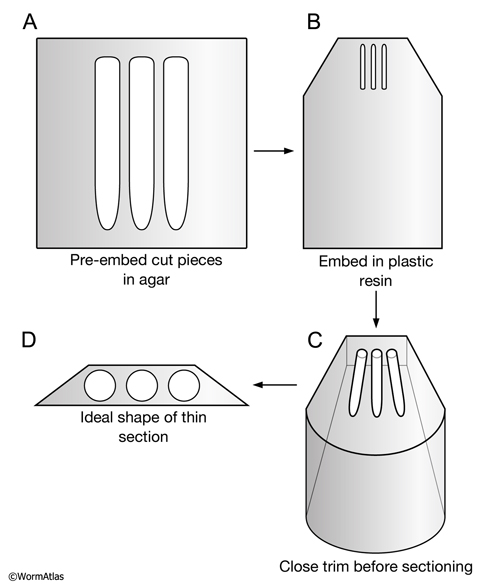
Trim the block face to a perfect trapezoid, where the longest side is at least a little bit shorter than the size of the diamond knife. Trimming can be done by hand under a dissecting microscope using razor blades, or on the microtome platform, using glass knives to shave the sides of the block mechanically. The shape of the block should become a truncated pyramid, where the tissue is in the center, with very little plastic surrounding the tissue (EMSTSFIG 1). Smaller blocks always cut better than larger blocks.
 EMSTSFIG 1 EMSTSFIG 1
Alignment
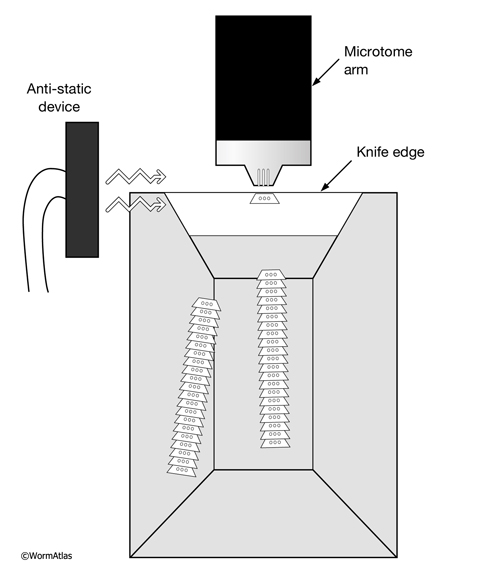
Align the block in the microtome chuck so that the longest side of the trapezoid is at the bottom. The top and the bottom edges must be perfectly horizontal with respect to the edge of the diamond knife (EMSTSFIG 2). Thick sections (12 µm) can be cut with a glass knife, mounted on a glass slide, and stained with a 1% Toluidine Blue to look for reference points under a light microscope. This step saves time and effort before switching to thin sections, so that a region of interest can be quickly approached. This step also provides a very smooth block surface and allows one to judge the quality of the embedding. To assure that sections stick together in a ribbon, the top and the bottom side should be perfectly parallel. Additionally, a small amount of sticky glue can be applied to the truncated (top) side with a sharpened toothpick. The block surface should then be aligned so that the surface of the block is perpendicular to the knife edge, and the bottom edge of the block is parallel to the knife edge. This step is easier to accomplish on modern ultramicrotomes where illumination is provided from below the knife holder. The distance between the knife-edge and the block face can then be seen more clearly. As the knife approaches the block surface, the shadow between the block surface and the knife edge should become narrower. After that shadow has disappeared, change the thickness setting on the microtome to 50 nm to begin collecting thin sections.
 EMSTSFIG 2 EMSTSFIG 2
Thin Sections
On modern ultramicrotomes, the automatic advance is quite reliable and ribbons of 50 nm sections can be achieved routinely. Sections of this thickness will show a whiteyellow interference color while floating on the trough of the diamond knife. On older microtomes, the motorized advance may be less reliable, but turning the cutting wheel by hand can achieve a rather consistent section thickness. On a modern Leica ultramicrotome, it may be possible to collect sections as thin as 35 nm by manually moving the block past the diamond knife at very slow speed.
Troubleshooting
Sectioning speed is certainly an issue and varies from one model to another. Most ultramicrotomes allow one to slow the speed of the microtome arm as the block approaches the knife. Slower cutting action helps to achieve thinner sections. The thinnest possible sections are probably achieved by hand, using a very slow speed during the cut, but the user must develop a smooth rhythmic control of the microtomes advance wheel to get such thin sections without introducing chatter. The microtome must be positioned to minimize exposure to building vibrations, airflows, or nearby footfalls. The machine should be installed on a very stable bench, away from heating or cooling vents, and away from fellow members of the lab.
The use of an antistatic device (EMSTSFIG 2) is useful in winter months to reduce problems with static charge building up on either floating sections or the knife edge. These devices are available from NRD Inc. (Grand Island, NY) or from EMS/ Diatome.
Picking up sections
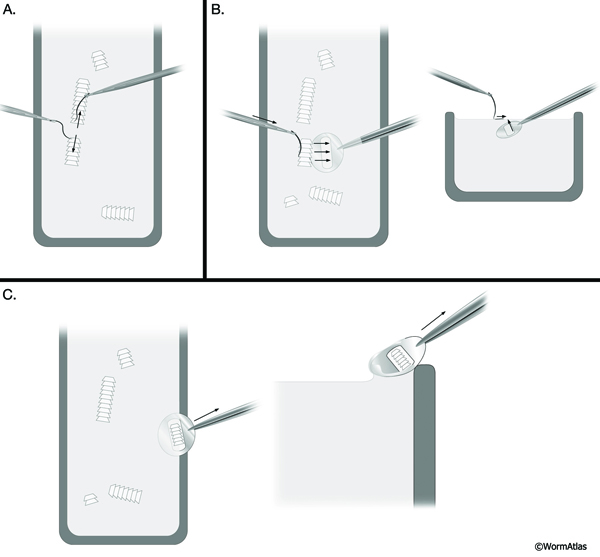
After having achieved a ribbon of sections, one needs to pick up the sections onto a grid and keep them in order. Using glue on the top side of the pyramid, the thin sections should stick together in long ribbons. The ribbons can easily be separated with an eyelash mounted on a toothpick (or if one is ambidextrous, using two eyelashes on two toothpicks) (EMSTSFIG 3A).Thus,each group of sections can be separated from a longer ribbon to match the length of the slot on a coated copper grid. Only slotted grids should be used for serial sections, in order to ensure that every part of each section can be examined. To pick up a ribbon of sections, hold the grid at an angle from the side of the boat, go underneath the ribbon to be picked up and slowly lift the grid out of the water, allowing the right side of the ribbon to attach to the edge of the slot first before the left part (EMSTSFIG 3B). If the operator has two steady hands, an eyelash fastened to a toothpick can be used to gently tease the far side of the ribbon onto the far side of the slot (EMSTSFIG 3B). When removing the grid with sections from the boat, gently scrape the bottom of the grid along the right side of the boat to remove excess water from beneath the grid (EMSTSFIG 3C).
 EMSTSFIG 3 EMSTSFIG 3
We recommend using an O-ring as a fastener to keep the forceps closed while holding the grid. When the grid has new sections collected onto it, wet grid can be gently wiped at its edge with a Kimwipe to remove excess water from both the forceps and from the bottom side of the grid, and then the closed forceps are placed aside on the benchtop to dry thoroughly. Once dry, grids are placed in order into a grid box. Make sure to create a written record of which sections are on each grid.
Helpful Hints
To break a ribbon of sections into two pieces, the most reliable means is to use two eyelashes (attached to toothpicks). Hold one eyelash onto each of two consecutive sections in the middle of a ribbon and then pull these two sections away from one another to break the ribbon at the desired location.
Notes
There should be no visible separation of the resin from the embedded tissue, when viewed by semithin section under the light microscope, or in a thin section viewed by TEM. If the specimen shows wrinkling of the animal despite uniform unwrinkled plastic resin around the animal, this is an indication of poor infiltration and the animal is not worth pursuing in serial sections. If most or all animals show this defect, the infiltration step has failed and one should start a new fixation.
Poor infiltration can result from too fast infiltration, or impure solvents (contaminated with water, for instance). If the whole block is soft, the problem could be retention of water or solvent in the plastic resin, expired accelerator (less likely), or an incorrect resin mixture. Sometimes a soft block can be improved by a longer heat cure.
Another common method for assuring excellent success at collecting serial thin sections utilizes the perfect loop to transfer groups of ribbons from the knife boat to an intermediate loop and then transferring them again to the specimen grid. Nichol Thomson may have used this method, through which he could consistently move three consecutive ribbons of sections to a coated mesh grid with unerring success. This method was recently described in detail by Mironov et al. (2008). It is also possible to use the Perfect Loop to move single ribbons to a coated slot grid (Polishchuk et al., 2000).
Figures
 Click pictures for new window with figure and legend, click again for high resolution image Click pictures for new window with figure and legend, click again for high resolution image
EMSTSFIG 1: Essential steps in embedding and trimming small pieces. A. Embed fixed worm pieces in agar to position them close together (with uniform orientation). B. Embed the agar block into plastic resin in a mold and heat cure.
C. Trim the block into a pyramidal shape by hand or using a glass knife on the microtome stage to make a close approach to the embedded worms. D. Final shape of the top of the block face just prior to thin sectioning. Long edge will be bottom of block during microtomy.
EMSTSFIG 2: Thin sections floating behind diamond knife. Top view of boat behind the diamond knife. An antistatic device minimizes static charge buildup caused by friction between the block and diamond. Ribbons of thin sections stick together, floating on the distilled water in the boat trough. The leading edge of each section is wider than the trailing edge.
EMSTSFIG 3: Thin section pick up by the Hartwieg method. A. Ribbons of thin sections are broken into shorter ribbons using eyelashes glued to toothpicks as tools. B. Slot grid is held under water beneath a ribbon, using an eyelash to coax the ribbon toward the slot, while raising the grid slowly out of the boat. C. Excess water is removed from the bottom of the grid after section pickup, by gently scraping the grid on the edge of the boat.
References
Hall, D.H., Hartweig, E. and Nguyen, K.C.Q. 2012. Modern electron microscopy methods for C. elegans. Methods Cell Biol. 107: 93-149. Abstract
Mironov, A.A., Polishchuk, R.S. and Beznoussenko, G.V. 2008. Combined video fluorescence and 3D electron microcopy. Methods Cell Biol. 88: 8395. Article
Polishchuk, R.S., Polishchuk, E.V., Marra, P., Alberti, S., Buccione, R., Luini, A. and Mironov, A.A. 2000. Correlative light-electron microscopy reveals the tubular-saccular ultrastructure of carriers operating between Golgi apparatus and plasma membrane. J. Cell Biol. 148: 4558. Article
|